Wednesday, April 25, 2012

Homemade Fortune Cookies

via
Hello! It's Lynn's daughter Kelly again. I'm here to guest blog about my most recent Pinterest recipe experience. Go check out more photos from my attempt at making these, or read about my upcoming summer in France on my blog, Rainboots & Beef.
This recipe is from Kelly (good name!) at Just a Taste. Here is her recipe (with my additions and improvements in red):
Homemade Fortune Cookies
Yield: 16 fortune cookies
Ingredients:
2 egg whites
½ teaspoon vanilla extract

¼ teaspoon cinnamon
½ cup all-purpose flour
½ cup sugar
Handwritten fortunes (optional)  I used quotes from my motivational quote board on Pinterest. (Lynn here - good choice Kelly!)
1 cup chocolate chips (optional) Ha. My cookies were so ugly I didn't feel like wasting chocolate on them.
Sprinkles, for garnish (optional) I ate the sprinkles out of the jar while I cooked, if that counts for anything.

Directions:
Preheat the oven to 350ºF. Line a sheet tray with parchment paper or a Silpat. (I didn't have either. Instead I just greased a regular cookie sheet.)
In a large bowl, whisk together the egg whites, vanilla, cinnamon, flour and sugar. The batter will be very loose. (The batter wasn't exactly lose. It was kind of like glue. I definitely approve of the cinnamon and vanilla in fortune cookies. It made them taste more like sugar cookies than fruit loops, which I think store-bought fortune cookies tend to taste like.)
Using a small spoon, scoop about 1 tablespoon of batter onto the lined cookie sheet. Use the back of the spoon to smooth the batter into a very thin circular layer. (This didn't exactly work for me because the cookie sheet was so greasy and slippery.) Repeat this process with additional batter to form two or three circles of batter on the cookie sheet. (I did three at a time. This is so you can insert fortune, fold, and pinch without the cookies beginning to harden, theoretically.)
Bake the cookies for 5 to 7 minutes, or just until the edges of the cookies begin to brown. (About six minutes seemed to work best for me, but if your cookies were as thin as they are supposed to be...this might be the burning point.)
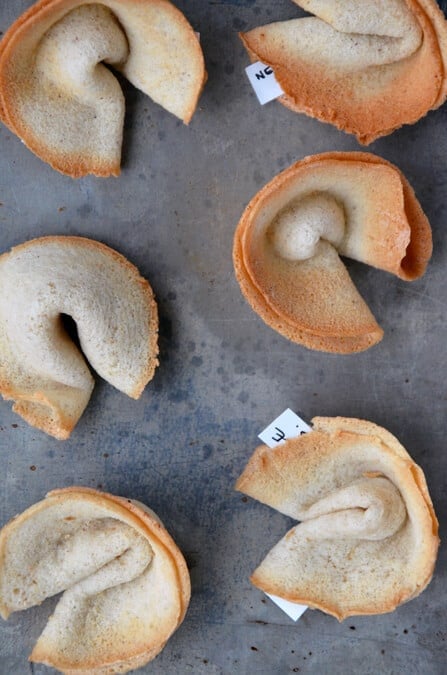
Remove the cookies from the oven, place the handwritten fortunes in the centers of the cookies, and then use a flat spatula to very carefully release the cookie from the sheet tray. Fold it in half, then pinch the edges inward (as shown above) to create the fortune cookie shape. Continue this process with the remaining cookies, which will harden within 30 seconds of being formed. (This just didn't work. I placed the fortune on the cookie and spatula-ed the cookie off the cookie sheet, but when it came time to fold in half, they just broke, for the most part. The few that didn't break, were way too hot to pinch. About 2 cookies that I made even slightly resembled the shape of a fortune cookie, and none of them had even a slightly similar texture. They were basically folded sugar cookies with paper inside...and the paper was so enmeshed in the batter that you could hardly decipher what the fortune said.)
As an optional garnish, melt the chocolate chips in the microwave in 20-second intervals then dunk the hardened and cooled cookies into the chocolate. Immediately decorate the chocolate-dipped cookies with sprinkles and let harden. (Didn't do this. My cookies were too ugly.)

Nutritional Information:
16 servings
Amount per serving:
Calories:             41
Fat:                      .1g  
Carbs:                9.3g
Fiber                    .1g          
Protein:                 1g 
Weight Watchers Points Plus Value: 1

I probably wouldn't make these again unless I had a different recipe. I give this recipe 2 pins.
The result:
via
Thanks for letting me guest blog and I hope you stop by and check out my blog, Rainboots & Beef, sometime soon!
If you just hopped over here from Pinterest, Welcome! Feel free to check out any of the other recipes I have reviewed. And come back for another visit sometime soon. - Lynn

Monday, April 23, 2012

Teriyaki Chicken

This recipe is from Pam over at For the Love of CookingSee her recipe or follow the recipe here (with my additions and improvements in red):
Teriyaki Chicken - Serves 6
6 boneless skinless chicken thighs, trimmed of fat
1/4 cup soy sauce
2 tbsps brown sugar
2 tbsps chicken stock
2 tbsp rice vinegar
1/2 tsp sesame oil
2 garlic cloves, minced
1 tsp fresh ginger, finely grated
1/4 tsp red pepper flakes
2 tsp sesame seeds
1) Combine the soy sauce, sugar, chicken broth, vinegar, garlic, ginger, sesame oil and red pepper flakes (if you're not fond of chewing on a red pepper flake, go with 1/8 tsp of cayenne pepper or none at all) in a large zip lock bag. Mix until well combined. Add the trimmed chicken thighs to the marinade, seal the bag, and place in the refrigerator for up to 4 hours. (I went with one hour the first time I made this and the flavors came out great. Second time I marinaded for the full 4 hours and the flavors came out even better.)
2) Heat a large skillet over medium heat then coat with cooking spray. Once the pan is hot, add the chicken thighs and cook for 4-5 minutes on each side or until the chicken is cooked through. Sprinkle the chicken with sesame seeds and serve immediately. 
(When I followed Pam's instructions to fry the chicken, I never did get that deep, thick glaze that she achieved in the above picture. So, I baked it to see what I could get. Still not the same glazed look. But I do have to say, I preferred the baked chicken over the fried. Baking held the moisture in the chicken and gave the teriyaki flavors more of a chance to develop.)
Enjoy. (I agree!)
Nutritional Information:
6 servings
Amount per serving:
Calories:        109
Fat:                 3.1g
Carbs:             7.2g
Fiber                 .1g          
Protein:         14.2g 
Weight Watchers Points Plus Value: 3
This really was a very good chicken recipe. We had company the night we enjoyed it and everyone commented on how good it was. So, therefore, with only that one modification of baking instead of frying, I give this recipe 4 glorious pins!
If you just hopped over here from Pinterest, Welcome! Feel free to check out any of the other recipes I have reviewed. And come back for another visit sometime soon. - Lynn


Shop Amazon - Mother's Day Gifts

Thursday, April 19, 2012

Chicken, Shrimp and Chorizo Paella


via
This recipe is from Diana and Lisel over at The Jewels of New YorkSee their recipe or follow the recipe here (with my additions and improvements in red):
Chicken, Shrimp and Chorizo Paella - Serves 6
1 Spanish chorizo sausage, sliced
2 tbsps olive oil
6 chicken thighs
1 medium onion, diced
2 cloves garlic, minced
1 tomato, diced (The authors never state when to add the tomato in. So I added it when the broth and rice went in. This seemed to me to be the correct time.)
1 tbsp flat leaf parsley, chopped
1/4 tsp Spanish paprika
3 1/2 cups low sodium chicken broth (I ended up using 4 cups of broth, because I needed a tad bit more to get the rice completely done.)
1/4 tsp saffron threads, crumbled
1 1/2 cups Arborio or other short grain rice
1 lb large shrimp, peeled and deveined
1/4 cup frozen peas, thawed
1 lemon
salt and pepper to taste
1) Season chicken with salt, pepper and a light dusting of paprika.
2) In a large paella pan (I don't have a Paella pan, but I do have a flat-bottomed wok. So I went with that and it turned out great), heat oil over medium high heat. Saute chorizo until browned and edges curl. Remove and reserve for later use. In the same pan, add chicken and brown skin side down until crispy but not cooked through. Reserve to the side.
3) Over medium heat, saute onions, garlic and parsley until golden and soft (I have found that sauteing onion, garlic and herbs together makes for dark brown, if not burnt garlic and herbs. So, I sauteed the onions by themselves for awhile and then added in the garlic and herbs.) Combine rice and broth (I went with 4 cups) into mixture. (I also added the tomato in at this point.) Bring to a boil. Salt and pepper to taste and add crumbled saffron.
4) Add chicken, chorizo and shrimp and continue to simmer without stirring until the liquid has evaporated and the rice is cooked through, about 15 minutes. Cover with foil to ensure all rice cooks through. (I turned the heat down low for this. Basically you are letting steam finish the rice.) Finish paella by turning up the heat during the last bit of cooking, this gives a nice toasted rice bottom to the dish. (Letting the rice steam for about 10 minutes developed the crusty bottom to the rice.) Let the dish rest for about 5-10 minutes before serving.  Stir in peas and garnish with more parsley and lemon wedges.
Nutritional Information:
6 servings
Amount per serving: 
Calories:           325.5                   
Fat:                     12.9g
Carbs:                 16.9g
Fiber                     1.2g          
Protein:               33.9g 
Weight Watchers Points Plus Value: 8
Thoughts: This was really good. Flavorful, spicy and smelled wonderful while cooking. It reminded me a lot of cooking Gumbo. I served this with a side of broccoli and the dinner was enjoyed by all. This recipe deserved 5 yummy pins!
If you just hopped over here from Pinterest, Welcome! Feel free to check out any of the other recipes I have reviewed. And come back for another visit sometime soon. - Lynn


Shop Amazon - Mother's Day Gifts

Monday, April 16, 2012

Roasted Cabbage Wedges


via
This recipe is from Martha over at marthastewart.comSee her recipe or follow the recipe here (with my additions and improvements in red):
Roasted Cabbage Wedges - Serves about 6
1 tbsp plus 2 more tbsps extra-virgin olive oil
1 medium head green cabbage, cut into 1-inch thick rounds
coarse salt and ground pepper
1 tsp caraway or fennel seeds (I'm not fond of fennel so the first time I made this I used caraway. But then after that, I didn't use any seeds. Just the olive oil, salt and pepper were enough for me.)
1) Preheat oven to 400 degrees. 
2) Brush a rimmed baking sheet with 1 tbsp extra-virgin olive oil. Place 1 medium head green, cut into 1-inch-thick rounds, in a single layer on sheet and brush with 2 tbsps oil.
3) Season with coarse salt and ground pepper and sprinkle with 1 tsp of caraway or fennel seeds.
4) Roast until cabbage is tender and edges are golden, 40 to 45 minutes.
Nutritional Information:
6 servings
Amount per serving: 
Calories:                97.5              
Fat:                         7.2g
Carbs:                     8.2g
Fiber                       3.5g          
Protein:                   2.2g           
Thoughts: This is totally my new favorite roasted vegetable dish. My hubby and I love it. It goes with just about anything. It smells good and is very filling. I wholeheartedly give this recipe 5 happy pins.
If you just hopped over here from Pinterest, Welcome! Feel free to check out any of the other recipes I have reviewed. And come back to visit again sometime soon. - Lynn


  Shop Amazon - Mother's Day Gifts

Friday, April 13, 2012

Man-Pleasing Chicken


via
This recipe is from  Jenna over at Witty in the CitySee her recipe or follow the recipe here (with my additions and improvements in red):
Man-Pleasing Chicken - Serves 6
1/2 cup Dijon mustard
1/4 cup maple syrup
1 tbsp rice wine vinegar
1 1/2 lb package chicken thighs, skin removed (My personal experience says that chicken thighs are the superior cut to use. They are higher in fat and thus suck more flavor into the meat.)
salt and pepper
fresh rosemary
1) Preheat oven to 450 degrees (At first I thought this was a misprint. 450 degrees is pretty high. I was worried that high of a temperature would burn the maple syrup, but it didn't. But I was so worried, I kept opening the oven to check on it. So maybe 450 wasn't really the best temperature for me to cook at. Next time I'm going to go with 350 and not worry so much.)
2) Mix together the Dijon mustard, maple syrup and rice wine vinegar
3) Put chicken in oven-proof baking dish. Pour maple mustard mixture over the chicken, turning the thighs in the mixture so they are fully coated.
4) Put thighs in the oven, and let the bake for 40 minutes or until a meat thermometer reads 165 degrees. Baste the tops of the chicken with more sauce half way through.
5) Let the chicken rest for 5 minutes before serving. Plate the chicken, making sure to spoon some extra sauce over the top. Sprinkle some fresh rosemary on top. (I tried half with rosemary and half with basil, just because I had some in the fridge. Actually, both were great. Probably any fresh herb would be wonderful.)
Nutritional Information:
6 servings
Amount per serving: 
Calories:                308             
Fat:                         3.6g
Carbs:                   10.6g
Fiber                         .7g          
Protein:                 55.3g           
Weight Watchers Points Plus Values: 7
Thoughts: This is, without a doubt, my new favorite way to make chicken. The mustard and maple balance each other out so nicely. If you're worried about a strong mustard taste, don't. The flavors were delightful. Not only was this recipe Man-Pleasing, but the woman was quite pleased as well. I wholeheartedly give this recipe 5 proud pins!
If you just hopped over here from Pinterest, Welcome! Feel free to check out the other recipes I have reviewed. And come back for another visit sometime soon. - Lynn


Shop Amazon - Mother's Day Gifts

Monday, April 9, 2012

Spicy Drunken Shrimp


via
This recipe is from Barbie over at Wishful ChefSee her recipe or follow the recipe here (with my additions and improvements in red):
Spicy Drunken Shrimp - Serves 2
1/2 pound shrimp
1 can of beer
1 shallot, sliced
2 cloves garlic, chopped
1 tsp red pepper flakes, or to taste (I went with 1/8 tsp, because I know how hot red pepper flakes can be)
1-2 bay leaves
fresh chipped parsley
salt and pepper, to taste
1) Add shallot, garlic, red pepper flakes and beer in a large saucepan and turn heat on high. Bring to a boil and reduce beer sauce by half, stirring occasionally.
2) Add shrimp and cook until pink, about 3-4 minutes. Season with salt and pepper, if needed. Serve with crusty bread or on top of rice. (I served it over rice)
Thoughts: This was the blandest shrimp recipe I have ever come across. I thought with the different flavors thrown in there we would have a very tasty dish. No such luck. Will never make this again. This dish gets just 1 pin. Save your shrimp for something much more interesting.
If you just hopped over here from Pinterest, Welcome! Feel free to check out any of the other recipes I have reviewed. And come back for another visit sometime soon. - Lynn


Friday, April 6, 2012

Raspberry Lemon Cheesecake

Post image for No Bake Raspberry-Lemon Cheesecake
This recipe is from Jamie over at My Baking AddictionSee their recipe or follow the recipe here (with my additions and improvements in red):
Raspberry Lemon Cheesecake (No Bake) - Serves 6
Ingredients - Crust
3/4 cup graham cracker crumbs
1 tbsp sugar
3 tbsps unsalted butter, melted
Ingredients - Filling
2/3 cup sugar
Zest of 2 lemons
1 8oz pkg cream cheese, softened
2 tsps fresh lemon juice
1 tsp vanilla extract
1 8oz tub frozen whipped topping, thawed
1 cup fresh raspberries, slightly mashed with a fork (I slightly mashed and actually should have been mashed a bit more. Raspberries that were not mashed enough sunk to the bottom of the dishes while chilling.)
1) In a medium bowl, stir together the graham cracker crumbs and 1 tbsp of sugar and melted butter. Evenly divide the crumbs between your individual serving dishes and press into the bottoms of the dishes to form a crust layer.
2) In a large bowl, mix together the sugar and lemon zest until the sugar becomes moist and fragrant. (This was my favorite part. It smelled so good.) Add cream cheese and beat with an electric mixer until smooth. Add lemon juice and vanilla mixing to combine. Using a rubber spatula, fold in the whipped topping until will blended, then folded in the raspberries.
3) Evenly pipe or spoon the filling into individual serving dishes. Cover with plastic wrap and refrigerate for at least 2 hours before serving. If desired, garnish with fresh raspberries and a sprig of fresh mint.
Nutritional Information:
6 servings
Amount per serving: 
Calories:                351              
Fat:                       17.2g
Carbs:                   44.6g
Fiber                       1.7g          
Protein:                      6g           
Weight Watchers Points Plus Values: 10
Thoughts: I made these little cheesecakes with thawed frozen raspberries because I was very ready for winter to end and spring to begin. That was a perfect idea. They came out very light and fluffy. Nice raspberry taste, followed by the fresh lemon was like heaven. I loved it. Proudly, I give this recipe a bold 5 pins. Enjoy!
If you just hopped over here from Pinterest, Welcome. Feel free to check out any of the other recipes I have reviewed. And come back to visit us again sometime soon. - Lynn

Wednesday, April 4, 2012

Gluten-Free Black Bean Brownies

Black Bean Brownies (Gluten Free). Photo by Marg (CaymanDesigns)
This recipe is from Calouste over at Food.com. See her recipe or follow the recipe here (with my additions and improvements in red):
I've put the recipe below, but, truly, save yourself the trouble and DON'T MAKE THIS! It tastes nothing like chocolate. It tastes like black bean cake. It is grosser then gross. I couldn't wash my mouth out fast enough. Never again.
Gluten-Free Black Bean Brownies
1 (15 1/2 ounce) can black beans (rinsed and drained)
3 eggs
3 Tbsps oil
4 Tbsps cocoa powder
1 pinch salt
1 tsp vanilla
3/4 cup sugar
1) Mix ingredients together in a blender/food processor until pureed.
2) Pour into a greased 8 x 8 cake pan.
3) Stir in some chocolate chips and nuts, or leave plain. (I left mine plain to see what kind of canvas I was working with.)
4) Bake at 350F for approximately 30 minutes.
5) Let cool completely before cutting.
Nutritional Information:
16 Servings
Amount per serving: 
Calories:                102.2              
Fat:                          3.7g
Carbs:                    14.9g
Fiber                        2.1g          
Protein:                    3.2g           
Weight Watchers Points Plus Values: 3
Thoughts: Only make this is you really LOVE black beans in cake form, because that is exactly what it tastes like. Since my lowest rating is 1 pin, I will, indeed, give it 1 pin. If I could go lower, I so totally would.
If you just hopped over here from Pinterest, Welcome! Feel free to check out any of the other recipes I have reviewed. And come back for another visit sometime soon. - Lynn

Monday, April 2, 2012

Honey Lime Chicken Enchiladas

This recipe is from Jenna V and Jenna R at Just Cook AlreadySee their recipe or follow the recipe here (with my additions and improvements in red):
Honey Lime Chicken Enchiladas Serves 6
1/3 cup honey
1/4 cup lime juice (about 2 large limes)
2 tsp to 1 tbsp chili powder (I used 1 tbsp, but if you are a spice loving family, increase this to 2-3 tbsps) 
2 large cloves of garlic, finely minced or 1/2 tsp garlic powder (I used the garlic powder, but next time will use more than 1/2 tsp)
1 lb boneless skinless chicken breasts (about 2 large breasts, cooked and shredded)
12 corn tortillas
2 cups of Mexican cheese blend, shredded (1 small bag usually is 2 cups)
1 14-oz can of green enchilada sauce (mild or medium, to your taste)
1/2 to 3/4 cup of heavy cream (I used 3/4 cup and felt it ended up being a little too creamy)
nonstick cooking spray
1 Tbsp chopped cilantro to garnish
1) Preheat oven to 350F. Place the cooked and shredded chicken in a medium-sized bowl. Set aside.
2) In a small bowl, place the honey, lime juice, chili powder and minced garlic or garlic powder. Whisk together thoroughly to combine. Pour this mixture over the chicken and cover with plastic wrap. Allow to marinate while you prepare the tortillas, 30 minutes or up to 1 hour, in the refrigerator.
3) Heat a large griddle till a drop of water skitters across (about 350F). Spray the surface with non-stick cooking spray or oil it with a little bit of canola oil in between each round of tortillas. Heat tortillas about 20 seconds on each side till warm and flexible and some golden brown spots have appeared. Remove the tortillas from the griddle and keep warm between a couple of paper towels until ready to use.
4) Spray the sides and bottom of a 9 x 13-inch baking dish lightly with cooking spray.
5) In a medium bowl combine the enchilada sauce and the heavy cream. Spread about 1/2 cup of the mixture in the bottom of the oiled baking dish.
6) Add a large spoonful (about 2 tbsps) (Mine ended up being a generous 1/8 of a cup) of the chicken mixture to the center of each tortilla in a line. Cover the chicken with a large tbsp (or big pinch) of cheese, then roll the tortilla up from one side to make a rolled enchilada - it will be more of an over lap on the seam side that rolled tightly. Place the enchilada seam side down in the baking dish starting at one end with the long edge parallel to the longest side of the pan so that you end up with two columns of six enchiladas each. 
7) Repeat with the remaining chicken, cheese and tortillas. (There was room in the pan to add about 4 more tortillas. If you don't have any more chicken left, make them cheese enchiladas.) You will use about 1 1/2 cups of the cheese for the filling and set the remainder aside for topping the enchiladas in the pan. Add the remaining marinade mixture to the enchilada sauce and cream mixture, if desired (I didn't have any left over). Pour this mixture over the top of the enchiladas. Sprinkle with the remaining cheese.
8) Bake the enchiladas for 30 to 35 minutes, until the cheese is melted and bubbly and starting to brown on top. Serve with sour cream, black beans, and rice or a green salad for a great meal.
Nutritional Information:
6 servings of 2 enchiladas each
Amount per serving: 
Calories:                467              
Fat:                       26.3g
Carbs:                   44.5g
Fiber                       3.9g          
Protein:                    16g           
Weight Watchers Points Plus Values: 13
Final Thoughts: If you like a creamy, sweet enchilada, this is the recipe for you. The honey mixed with the corn tortillas made for a very sweet corn taste. That amount of cream mixed with the enchilada sauce made for a generous amount of liquid on top of the enchiladas, even after cooking for 30 minutes. If I were to make these again, I don't know that I will, I would cut the honey in half, cut the cream in half and somehow add in onions. Either a white or yellow onion, sauteed and added into the chicken mixture would be great. This recipe deserves 4 pins, because it really would work well for some other family but mine. However, for my clan I am giving it 2 1/2 pins.
Enjoy!
If you just hopped over here from Pinterest, Welcome! Feel free to check out any of the other recipes I have reviewed. And come back for another visit sometime soon. - Lynn
Who knew the lowly potato saved the world? See the ad below!